
It all started this past February of 2021 when I decided to hold a motherhood photography workshop in Charleston, SC. My husband and I started chatting about the prospect of having the whole family come along since we had never been to South Carolina before. We love traveling as a family of 6 anyways, and having a reason to make the trip seemed like a great starting off point. We then decided that it would be really great to take a few weeks and drive there, seeing different places along the way. So that led to us pricing out an RV rental for what we figured would be about 5 weeks. Our jaws dropped when we saw the prices… upwards of $10k, and that was just for a generic RV that had zero personal touch to it; no to mention the cost of food, gas, etc.
So that’s when we figured… why not buy something, and renovate it to meet our (let’s be real, my) aesthetic desires! Thankfully my husband was on board and we began to search. We wanted something very specific for a couple of reasons… it needed to be a pull behind because having 4 children, a pick up truck couldn’t accommodate us all unless we wanted to stick a child in the front, which we did not. So then we figured we could get a lighter pull behind that we could tow with the Yukon Denali XL, that had a specific tow package on it. So now we also needed to sell my Volkswagen Atlas, and also find a new car!
Thankfully we did all of the above, and it all fell into place just as things seem to do when one prays about them and follows where one is being led.
So we found the SUV, and the trailer on the same day and just a couple hours from one another. We ended up with a 2017 Forest River Wildwood x-lite. We choose this model because it has a bedroom in the front with a queen bed, and a bunkroom in the back with three bunk beds. We also converted the large dinette into a full size bed/couch, so we all had plenty of beds. We wanted a bunkhouse so that we could put all the kids to bed in an actual room and shut the door, so we could talk or watch TV in the evening without worrying about waking the kids.
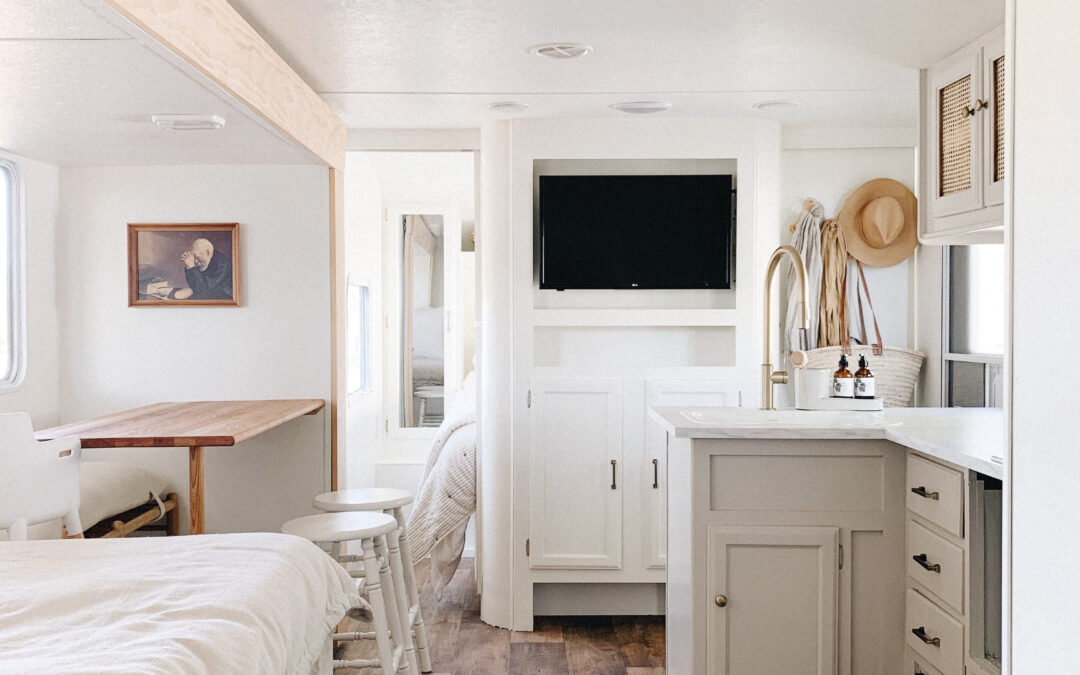
Now came the renovation part. I will outline the steps for what we did below. It took us 5 weeks, and we spent about $3k and did the bulk of the work outselves. And as you can see from the photos… it doesn’t even look like the same trailer! I have to say, especially with being gone for such an extended period of time, it was so nice to have a space that felt truly like our home to be in. I never felt homesick or tired of being there. We also made sure the kitchen we outfitted as normal as could be since I knew I would be cooking much of our meals there, and that miniature RV kitchen ware is just not cutting it for me and our large family.
Please note that we are self-taught DIYers and not trained professionals, so this step-by-step guide is based on our experience only. However, if you love to do things yourself just like us, I think you’ll find these steps effective if you’re renovating your own RV!

STEP 1: FIND THE RIGHT RV FOR OUR FAMILY
You can start by checking Facebook, RV trader, and even craigslist. If you have identified the floor plan that will work best for your family ( the larger your family the trickier this may become), then you can really narrow down your searches. We were searching all over, even other states, which you may have to do as well. This may also afford you the best deal. You can spend as little as a few thousand dollars, but then you also have to realize that you may be in for more work. We wanted to focus on cosmetic work, so water damage or parts that weren’t working, were not an option for us. We also only had 6 weeks before we were leaving to drive it across the country, so if you have more time, I would think this wouldn’t be as big of a dilemma.


STEP 2: GUT IT
Rip out anything that will not be staying. For us, we wanted to remove an outdoor kitchen that was taking up a ton of space in the bunkhouse, which thankfully ended up being a very easy thing to do. We also removed the giant armoire in there and replaced it with something smaller. The removal of both of those items opened up that space so much and allowed for storage, laundry, toys, and even a travel crib should I need it next time.
We ripped out the counter top, sink and faucet in the bathroom knowing we would be replacing those, and then we also ripped out the giant dinette that was taking up most of the space in the “living” area. We converted this to the full size bed/couch, and then removed the smaller RV couch and made that area the table for dining. We took out all of the counter, sink, faucet, microwave and oven in the kitchen as well. The flooring was a neutral vinyl wood like plank, and it wasn’t bad, so we decided to just keep that. We also removed all decorative trims, a little carpet that was peeking through, and the blinds.
*If your RV has any damage, this is when you want to repair anything. Thankfully ours did not.


STEP 3: PAINT
Paint is what will transform for your trailer. We choose Benjamin Moore “Simply White” for everything except for the kitchen and bathroom cabinets. This made it easy to just tape everything off like the windows and floors, and then we used a spray gun to spray it all. You also want to remove all hardware. Before you paint though, it’s very important to prep your surfaces properly, or else you will have a ton of chipping. Sand the heck out of everything you plan to cover with paint. You can use an electric sander or liquid sandpaper. Then you want to prime it all with an oil based primer, then paint. It took several coats for us to paint everything properly because of the nature of the surfaces in an RV. After we painted everything white, I used Benjamin Moore “Pewter Revere” to paint the kitchen cabinets and the bathroom cabinets. I removed the cabinet doors and painted them that way. I also spray painted the hinges so I could reuse those, and then I bought different hardware to swap out.


STEP 4: ADD ANY COUNTERTOPS, FLOORING, OR BACKSPLASH
We used the “luxury vinyl” peel and stick octagon tiles from Lowes for the “dining” area floor – which is really just a slide out where the table is. Because this was where the couch was before, there was just some funky carpet underneath, so I wanted to spruce it up and make it look like a separate space. I love how it came out. We installed a white faux brick backsplash in the kitchen area, and a peel and stick backsplash in the bathroom. We also installed a laminate countertop in the kitchen that really brightened it up, and we used a piece of wood that you would buy for a shelf from Lowe’s (so it is treated and finished already), as the bathroom vanity countertop! We used a wax to seal this since we knew it would be getting wet.


STEP 5: INSTALL HARDWARE, LIGHTING, WINDOW TREATMENTS, SINKS, FAUCETS AND OTHER PERMANENT FIXTURES
We installed new hardware on all of the cabinets and drawers, kept the lighting that was there, and added bamboo shades (although we didn’t do this until after the trip because I forgot about them until the day we left! So we ended up using those $5 temporary paper shades while we were gone and then worked great). For the sinks, I wanted a single basin sink in the kitchen in the largest size possible because I don’t like doing dishes when they don’t even fit in the sink! For the bathroom vanity sink, we also replaced that because I don’t like how small and shallow the one was that came in it. We used a large enamel bowl from walmart for the sink! We replaced the faucets, and I added some cane to the inside of two of the kitchen cabinets for an extra touch of texture. We also used two pieces of oak that were sold as stair planks, joined them together and added two simple legs and used that as our table.


STEP 6: SLIP COVER FURNISHINGS
We kept the base of the dinette to use as the base for our couch/bed. This way we could still use the storage underneath. We also kept the cushions and added a full size mattress to make it really cozy and “cloud” like. My dear friend sewed the slipcovers for all of these cushions for me using painters drop cloth and a kind of “envelope” style cover where the cushions could easily slip in and out which made them washable! I added four euro shams to the back cushions to make it more couch like.


STEP 7: DECOR AND FINAL TOUCHES
My favorite part! I would happily snap my fingers and have the rest done and skip straight to decorating if I could… I’m sure my husband would agree haha! Unfortunately it doesn’t quite work that way! I bought a queen size mattress for the front room, and three smaller cot size mattresses for the bunk beds. I used my favorite bedding on the front bed from Cozy Earth, and Beddy’s for the bunk beds! I chose Beddy’s because I didn’t want a tangle of bed sheets and blankets hanging down over the bunks. One thing is for sure, when spending time in a very small space, keeping things tidy and organized is key for a more enjoyable experience! And the Beddy’s have been amazing at keeping the bunkroom nice and tidy! The kids just hop out in the morning and zip them up! No floppy blankets or sheets… no frazzled mama.
I added some barstools that I found at a thrift store and painted to the table, as well as a bench that I found at Target but seemed to have been made for this space. The little armoire in the bunkroom was a facebook marketplace find as well! We opted for a countertop two burner stove that has been awesome, and this large convection oven that is way bigger than the RV oven and works really well… it even bakes my sourdough! I added a large basket at the front door for shoes – we don’t do shoes in our house either so this made since to us – and I placed smaller baskets along the top above the front bed for the baby’s clothes. I used command velcro strips to hang a few pieces of art on the walls… I opted for either poster frames with plastic instead of glass, or wall hangings that did not contain glass at all, just in case we hit a big bump while driving, I didn’t want to have to deal with cleaning up tiny shards of glass. We also used alien tape to tape down the soap holder in the kitchen, and the soap and toothbrush holders in the bathroom. This made it so that we didn’t need to move those items when we drove. I bought this runner from loloi because i like that it wasn’t a high pile… it was really easy to just sweep off! The homestead artwork was from Etsy and the saying grace print was from a thrift shop on Etsy as well! I kept everything light, neutral and calming and it really did reflect the feeling of our home that was as well.
We also invested in a hot water heater. It was about $600, and not a total necessity, but we didn’t want to have to deal with turning water on and off while bathing the kids, and I have to admit, it is SO nice to have. One other not necessary but nice extra expense if you can swing it is a good generator. There were several times on our trip that we were able to pull off on the side of the road and make a quick healthy dinner because of our generator. *the total cost of our remodel did not include the cost of the generator.


Our DIY RV renovation Source List:
(I will receive a small affiliate kickback for some of the items – to which I say THANK YOU if you use these links!)
-
Benjamin Moore “simply white”
-
Benjamin Moore “pewter revere”
-
Hot water heater – https://www.pplmotorhomes.com/parts/rv-appliances/rv-water-heaters/rv-water-heaters/rv-tankless-water-heater-girard-gswh2_42.3250
-
Beddy’s (LOVEDAPHNEMAE at checkout will get you 20% off)
-
Similar bunkhouse armoire (the one we have was antique)
-
Printable art for the walls – North Art on Etsy
-
Command velcro strips
-
Alien tape
CHECK OUT THE FULL TOUR ON OUR YOUTUBE CHANNEL BELOW!